Brussels Sprouts

Festivals here in USA are so much more different from what we are used to back home. Back home, festival means, the markets are full, fruits, vegetable and flower vendors do a brisk business at least till midday of the festival and many markets are open on the the day of festival. In fact during Deepavali and Dasara, shops are deliberately kept open for the sake of poojas. But here, festival i.e. Christmas means, everything including Dunkin Donuts is closed. Me and honey we went for a drive to check out if there will be any visible celebrations on the streets. To our surprise streets were deserted, malls were deserted, cinemas closed. We were wondering what happened to our bustling town. Where did all the residents disappear? It was a sight straight out of scary movies. (Reminds me of the movie 'I am Legend')
We were thinking of having our lunch at the Indian restaurant on Christmas day but that was not to be the case. Our beloved restaurant was also closed. So I had to dish up some thing very very fast. So did I!!
Here is one side dish that we had that day. We fast, very easy and very tasty as well. I am planning to make it regularly hence forth.

Brussel Sprout

You will need,

Brussels Sprouts 10 cut into halves
Extra virgin olive oil 1 tbsp
Chilly Flakes a generous pinch
Salt to taste

Method:
  • Heat the oil in a wide skillet.
  • When the oil is warm, lay the halved Brussels sprouts cut side down in a single layer.
  • Sprinkle salt and let it caramelize, that is about 8-10 minutes.
  • Once it starts to turn brown, flip over, sprinkle the chilly flakes and again cook for a few minutes.
  • The ones I used were very tender and were actually cooked with in 15-17 minutes. So keep a close eye on these. They are done in a zippy.
Enjoy!!!

Cranberry Scones

Of late I have started thinking about healthful recipes. Not yet in full throttle, but yes, sort of picking up speed in the direction. We got organic milk for the first time yesterday. I am yet to open the pack but then I realized it costs twice the ordinary variety. I only hope the benefits outweigh the cost of organic stuff. So in this regard, I wanted to make something healthy for the breakfast. We normally buy the store made waffles, pancakes, bagels etc. Now that I have started reading the calorie chart, I figured out even the harmless looking waffles are loaded with transfat/ hydrogenated vegetable oil and lot more calories. So I am looking to replace these unhealthy stuff with something more healthy but also something that we can grab during our rush mornings. I looked for a lot of muffin and scone recipes, shortlisted a few of them. I love the flavour of orange and cranberries. Decided to give it a try. However, most of the muffin and scone recipes called for refined wheat flour, which is currently on my 'do-not-eat' list. So I came up with this test recipe substituting whole wheat flour for refined flour. I could not wait to share the recipe for the scones turned out to be moist and fragrant. No one can ever know it was whole wheat flour. My scones passed my honey's taste test as well. So here goes the recipe. In fact according to him, this is the second best baked goodie ever from my oven! (The first one is well the Kobbari biscuit!) So people, go ahead and give it a try and do not forget the comments!


You will need,

Whole wheat (chapati atta) 1 cup
Heavy cream 1 cup (Next time i am gonna substitute half-and- half)
Butter 2 tbsp cut into tiny cubes
Sugar 1/4 cup
Salt a pinch
Baking powder 1 tsp
Orange juice (juice of half an orange)
Dried Cranberries 1/4 cup

Method:
  • Preheat oven to 350 F.
  • Sift flour and baking powder together.
  • Dump the salt, sugar butter cubes and cranberries. Give it a good mix.
  • Pour the cream and orange juice onto the flour mixture.
  • Mix it gently just till the everything is combined and moist.
  • Do not mix more than barely necessary
  • Roll out the dough and cut it into desired surface. (me, I just pinched small balls from the dough and baked them!)
  • Pop it into the oven and bake for about 12-15 minutes till it is golden brown on top.
  • Serve hot with may be coffee/ tea/Milk.
The best part of this recipe is the absence of eggs. I love this idea. Because for me baking without eggs has been pretty challenging. So now I can say I overcame a hurdle! And of course for all my friends who are pure vegetarian, here I present a recipe that you can enjoy!

Best of 2008

Pew!! at the end of 2008..It has been a very eventful year for me. Started dabbling with food-blogging, made new friends, and got to eat some really fabulous food. So as the curtains drop on 2008, Srivalli's best of 2008 provided the platform for the last act!!
So here it goes.
It has been an exciting journey. And here are highlights of 2008

1) Five tastiest dishes from my blog: (my honey's pick!)
2) Five best photographs/ Presentation: (my pick)
3) Five Disasters: (For obvious reasons I do not have the photographs!)
  • Rava Dosa (ended up in a sticky goey mess)
  • Nippattu (yes may be because of the poor quality of the flour used)
  • Habanero chillies (I bet my life, I will never ever get them)
  • Spinach Pasta (Had added salt twice!)
  • Jolada rotti (first attempt)
4)Big obstacles overcame:
  • Jolada rotti (Belive me, it was really tough and took me at least two three attempts)
  • Rava Dosa (Got it right just today so no pictures yet)
5) Resolutions for the new year:
  • Get into serious blogging, making recipes and measures exact
  • learn HTML so as to design better templates
  • Take better photographs and improve presentation
  • Eat healthy, whole and organic
  • Avoid junk.
  • Blog more healthful recipes.


Pho Chay

Recently we were introduced to Vietnamese cuisine.. Strangely though I had Vietnamese friends before, i had never really tried their cuisine. Finally when we did go there, we enjoyed the meal so much that I became an instant fan. My honey too liked his food so much because it was so much like our own food. I had ordered Pho chay the vegetarian noodle soup, my honey in his usual style ordered chicken curry.. We dived into the food instantaneously and i demolished an unbelievably huge bowl of Pho Chay. Pho is actually pronounced as 'Phaa' and i was actually confused about the pronunciation initially. Nevertheless. This dish is actually a 'absolute-must-try' kind of good, on top of everything, it is simple and can be put together in no time. Last night we just had bowl fulls of this soup and it was a perfect supper on a really cold day.

Photobucket

you will need,

Rice noodles cooked about 2 handfuls (more if serving it for the main course)
Mixed vegetables of your choice 2 cups ( I used Mushrooms, Broccoli and Chinese Cabbage)
Scallions 10-15 diced
Vegetable broth 1 can (about 2 cups)
Coriander chopped 2 tbsp
Tofu cubes 1/2 cup
Lemon 1/2

for the stock
Water 3 cups
Ginger 1/2"crushed
Garlic 2 cloves crushed
Cloves 4-5
Cinnamon 1/2"
Star Anise 1
Bay leaf 1

Method:
  • Combine all the ingredients listed for the stock in a big pot and bring it to a boil. Simmer for about 10 minutes.
  • Pour the stock through a sieve, reserve the stock and discard the spices.
  • Combine the stock, vegetable broth and scallions. Bring everything to a boil. Combine the tofu, mushrooms and broccoli. Cook for about 8 -10 minutes till the vegetables are crisp tender.
  • Adjust salt. Stir in the noodles. Finish with the coriander and lemon juice.
  • Serve hot.
It is an excellent one pot dish. Also, it is virtually fat free.

Paddu

And finally I got the Paddu pan. Paddu also known as gundpandulu/ bread idli, is a cross between idlis and dosas. It is prepared in a special muffin tin like pan. I finally got a new one after a lot of deliberation and search. Apparently there is something called Aebleskiver, which is a Scandinavian sweetish paddus.. In the United States it is called pancake puff. I was surprised to see a Thai version of paddus also. What globalisation are we talking about now? Globalisation is probably an ancient phenomena! just that the diffusion back then occurred much slowly and seamlessly..
Back to Paddu again.. We have been coveting for some paddu for a while now. Sadly enough i could not fine it in Patel stores and also at 'Oak Tree road' which is the de facto 'chickpet'. So i started looking online and found something called puff pancake pan. So got it just the other day from 'Target'. Bingo, comes some Paddu from my kitchen.

Photobucket

Well it so happens that I had run of out the idli-dosa rice- the short grain stubby ponni rice/salem-rice/idli-rice or also known as tindi-akki. But I had some arborio rice lying unused and i had no plans of dishing out Risotto in the near future. So I decided to use arborio rice for my paddu. It turned out fine. May be not perfect. I will need to use the Ponni rice and find out how better it will turn out. So till then it is going to be arborio!

You will need,

For the batter:

Urad dal 1 measure (measure is the container you used to measure, could be a small cup, big spoon, anything; but use the same container to measure out all ingredients)
Rice 3 measures
Channa dal 2 tsp
Methi a pinch
Beaten rice/poha 2 tsp
Koshar salt to taste

Post-batter!!!
Onion 1 small minced
Curry leaves 4-5 minched
Green chillies 2-3 minced

method:


  • Soak all the ingredients under batter for at least 4-5 hours, preferably over night. Grind it into a smooth paste. Set aside to ferment for as long as required. Here, right now during winters, fermenting needs almost 18-20 hours!!!
  • Once the batter is fermented, i.e the batter has almost doubled in volume and smells sour, fold in the minced onions, curry leaves and green chillies, very gently.
  • Heat the paddu pan. Grease it as required. Mine is a cast iron pan so required a lot more grease than a non-stick pan would.
  • Pour spoon fulls of batter into the holes. Drizzle some oil and cover.
  • Cook for about 10 minutes. Turn them over and cook till done
  • Serve hot with coconut chutney and ghee.

Hagalkai Gojju/ Sauteed Bitter Gourd

In the context of my Indian sensibilities, one thing that rather obfuscates me is the usage of 'flavour'. In the American food channels, 'salt' adds flavour to food. In Indian contexts, salt adds 'Roochi' -taste and there are five types of 'roochi'- salt, bitter,sweet, sour and pungent. So if salt is a flavour, then all those 'roochi' must also be classified as 'flavour' I am not really sure.

Anyway, 'bitter' is an important part of Indian cooking. Fenugreek seeds, Mustard, Bitter gourd and fenugreek greens are very important part of our regular fare. I have not often noticed 'bitter' in the Continental/American cuisine. But we love our bitters, don't we. Of all these bitter gourd is something i have always loved. That is one vegetable that required some skill to be palatable. Apart from what my mom makes, there are two bitter gourd dishes that lingers in my memories. One is again the Sabarmati Hostel mess. In our mess, our cooks used to prepared Aloo-karela in winters. I loved it. I remember, on such days, I would have eaten all the karela part, asking for second helping ;even as most of the hostel residents would ask for more 'aloo' while I asked for more 'Karela'.
The other dish is something i ate just once. Back in the 1990s when my father was posted in Amritsar, we were invited for a dinner party and there, our gracious hostess served us this dish. She did not tell us outright that it was 'karela' least we refuse to try it. It looked much like a pakoda. It was truly delicious. I have never had something like that ever again. It was basically seasoned bitter gourd stuffed with spicy potato filling and deep fried till sort of deep brown. We never got to know the recipe. Our hostess spoke only Punjabi, we spoke no Punjabi..I will need to try it sometime. But, for now, it is my mother's standard 'Hagal Kai gojju'


You will need

Bitter gourd 2 (about 1/2 lb)
Jaggery grated 3 tbsp
Sambar powder/ Huli Pudi 2 tsp
Salt to taste
Tamarind paste 1 tsp
oil 2 tbsp

Method:
  • Petite dice bitter gourd. Heat oil in a pan and toss the diced bitter gourd, saute till soft.
  • Combine the Sambar powder, grated jaggery and tamarind paste in a small mixing bowl along with about 1/2 cup of water.
  • Pour the Sambar powder mixture onto the bitter gourd. Simmer.
  • Adjust salt. The consistency can be adjusted as desirable. Mom makes it rather dry, so i follow her. Mine is also pickle like in consistency, almost no gravy. If gravy is desired, just go ahead add a little more water.
  • Serve hot with rice... enjoy

Pepper Cheese Choux Pastry

Choux Pastry is a light and sort of crunchy pastry that is used in éclairs and other stuffed goodies.They are French in origin and are as elegant as French people themselves!

My first brush with this pastry was long back, during my school days..those days when I used to teach junior kids in our neighborhood. My father had got me the membership at British library back in St.Marks road, Bangalore. I used to get a lot of good books and ,magazines, amongst them included 'Good House Keeping' and one more ladies magazine that sounded like house-keeping and women..can't exactly remember the title.So that was my introduction to continental fare, French and Italian cuisines fascinated me and my pasta and pastry disaster started from there!!(I have remained an ardent fan of Italian food and French deserts ever since.. more so after tasting the real good stuff)

This particular recipe was that of a Choux pastry with custard filling that was designed like a duck, the regular Choux pastry shell with a sort of curved long 'S' acting as the neck of the duck. I liked the presentation so much and I had to try. Bingo, I start of. I was so excited at the end of the whole process. Everything looked under control. The pastry went into the oven and the temperature was perfect we did not have power disruptions either.I was happy, peeking into the oven every minute or so. So finally the time was up and I remove the baking sheet. The end result did not quite look like what it did on the photograph in the magazine. I still went ahead. The custard was already prepared and cooled. So i had to spoon in the custard on the pastry shells. I did it. Just that the pastry shells had collapsed and there was nothing much to eat as much to drink!! I had made a whole big batch of gooey semi-solid stuff . My mom was already annoyed that i was wasting precious butter and eggs on something inedible.I had to make sure each one of the piece (i don't know what to call them) were sold off! So i resorted to bullying. I had my students at hand. It was plain and simple. Eat the thing or sit down for an additional hour of Mathematics! poor things!! that was no option. They sat down to eat. It was a sight. One particular little fellow (aged about 8-9 then now into engineering) was coxing the other to eat fast so that he would not have to eat the next one!!Indeed he remained apprehensive of eating anything I prepared after that.It is funny. We still are in touch those students and me, I wonder what his response would be if he ever saw the real one! My sister keeps reminding me about this incident!I should ask her to see today's end result, so as to get a point of reference as how bad the other one was..

Photobucket

Generally Choux Pastry is has fillings and is sweet. I was craving for something savory so, did some alterations to meet my cravings. Sticking to measurements I guess is very important in this recipe. Believe me I know what good ones can be as well as the bad ones ;)

Flour 1 cup
Butter 1 stick
Milk 1 cup
Eggs 4
Salt to taste
Pepper 1/2 tsp
Parmesan Cheese 1/4 cup (increase it if you like it richer and cheesier)

Method:
  • In a sauce pan, combine the milk and butter and simmer.
  • Once the butter is all melted, add the salt and pepper, mix well.
  • Dunk in the flour and mix it well. (Much like Ragi mudde) Keep mixing till the mixture comes together into a big ball and the flour stops smelling raw. Take it off fire and cool
  • Once the flour mixture is cool, add the eggs and the cheese, stir vigorously to mix well into a smooth batter. The batter will be pretty thin, slightly thicker than a cake batter.
  • Preheat the oven to 350 F.
  • Line a cookie sheet with parchment paper. It this stage, you can either spoon in the batter into small dollops or take it in a piping bag and pipe it into desired design. I did a few with the piping bag the rest, just dollops using a spoon.
  • Bake for about 15-20 minutes. (My oven took about 20 minutes) Keep a close eye on yours. It should be golden brown and puffed up. Serve hot with tea or coffee.

Awards

Yippeee... another award, this time from Paru. 'Brindavan' is a very sweet name for a blog; It reminds me of so many things... Lord Krishna (my ishta devata), Sri Purandara Das's songs,the holy Tulasi plant, Raghavendraswami Mutta apart from Iyengar bakery!! heheheh... For me everything culminates in food, including divinity...


Thanks for the award Paru

Spinach Cheese Pie

This Sunday is going to be the shortest day here in northern hemisphere, so days here are growing shorter and it gets so dark by the time we both get back home.This leaves us craving for something substantial in the evening. Every evening I have been fixing up something or the other. Today, I thawed some puff pastry sheets which were lying in my freezer for quite some time. Bingo, here comes warm savory pies.

Spinach Pies


This snack is also very much like the Cheese Puffs , Just the filling is slightly different. You will need,

Puff pastry sheets 2/3
Fresh Spinach 2 packed cups
Garlic 1 small clove
Chilly flakes as desired
Salt
Oil 1 tsp
Cheese 2 tbsp

Method:
  • Thaw the pastry sheet according to the package instruction.
  • Heat a pan to high as high as possible.
  • Add oil, once it smokes, drop the spinach, toss quickly.
  • Drop minced garlic and chilly flakes.
  • Wilt the spinach, adjust salt and set aside to cool.
  • Preheat oven to 400 F
  • To assemble the pie, cut the 2/3 sheet into 6 equal pieces.
  • Divide the cheese into 6 equal portions.
  • Mound the cheese on each of the puff pastry sheets and spoon in the spinach mixture.
  • Pinch the edges to seal it completely making it into rectangles/triangles.
  • Line in one to greased baking sheet and pop it into the oven. Bake it for 15 minutes or so, keep a close eye. (my oven does it in 15 minutes, your might take longer/shorter)
  • Serve it with tomato ketchup.

Koot

Recently we visited my honey's brother in Atlanta and my co-sister had prepared this wonderful dish. After a particularly long day, she served us this koot along with very hot rice and green beans palya. We loved the meal. I had to recreate it in my kitchen and got the recipe from her. I could not note down anything, instead heard it from her! Hope I am true to her recipe. Nevertheless it turned out absolutely delicious. This dish is actually a from Tamilnadu.

Photobucket

You will need,

Seeme Badanekai/ Chayote Squash 2
Hesaru bele/ Split Green Gram 1/4 cup

For the masala:
Coconut 4 tbsp
Jeera 1 tsp
Red chillies/ green chillies 6-7
Turmeric a pinch
Rice a tsp soaked in water

For the tempering:
Ghee 1 tbsp
Mustard 1/2 tsp
Curry leaves 8-9
Hing a dash
red chillies 2 broken

Method:
  • Pick the green gram, wash it in several changes of water. Petite dice the squash, combine both the ingredients in a pressure cooker. Cook till tender (1 whistle in my pressure cooker) Set aside to cool.
  • Combined all the ingredients listed under the Masala paste in a blender. Grind it into a smooth paste.
  • Once the pressure cooker is cool enough to handle, transfer the contents to a heavy bottomed pot, stir in the ground Masala. Turn on the heat and bring it to a gentle boil.
  • Prepare the tempering. Heat the ghee, when almost smoking, drop the mustard, hing, curry leaves and once they stop spluttering, add the red chillies. Turn off the heat pour over the simmering squash mixture.
  • Adjust salt and serve hot with steaming hot rice.

Bele Holige / Obbattu

Holige or Obbattu is something that is very special and connotes a feast. It is generally reserved for very special occasions and festivals. There are also many varieties, including peanut holige, sugar (sakkare) holige, Coconut(kai) holige, tur dal (bele) holige, sesame seed holige etc. The principle is the same. Prepare a sweet filling using the key ingredient then stuff it inside a flour dough, roll it out and cooking it on a hot griddle with oodles of ghee! It therefore should taste good technically! and often it does.


Here is the recipe for Bele Obbattu or the Tur dal obbattu; for some reason unknown, Ihave a soft corner for this variety. While me and Mom prefer this variety, dad and sis prefer the Coconut holige, so during all major festivals, mom ended up making both varieties, phew! the very thought of making both the holiges makes me break into cold sweat. Any ways, this recipe could be tricky... but if I can do it, so can anybody.


You will need,
For the filling (Hurana):
Tur Dal 1 cup
Jaggery 3/4 cup (can use upto 1 cup, but that will be too sweet for my palate!)
Cardamom 2

For the dough (Kanaka)
Maida/ All purpose flour 1 (may be 1.5 cups)
Salt pinch
Turmeric pinch
Oil 3 tbsp

Method:
  • Sift flour with turmeric. Stir in the salt. Dump the flour on to a large plate. (something we call Harivana in Kannada.. it is nothing but a big plate with big slanting rim).Make a well in the center of the well. Pour water into the well and start combing the flour and the water, making a dough much softer than chapati dough. The dough needs to be so soft that it is rather sticky. A spatula can be used to kneed the dough if the sticky dough is annoying. Cover the dough with oil and cover the bowl with a damp cloth and rest it for at least 2 hours. Of late I am using my Kitchen Aid stand mixer and it works like a charm.
  • For the filling. Combine the dal and about 5 cups of water and bring it to a boil. Simmer and cook till tender. Drain save the stock and use it in curries. (we make obbattina saaru, a delicacy in itself).
  • Combine the drained dal, crushed cardamom and jaggery in a thick bottomed pan. Cook the mixture till the jaggery has become molten and has combined well with the dal and the mixture has come together. It should be slightly molten, not completely dry. It will harden slightly once it is cooler. Also, it is easier to roll out the Holige if the Hurana/filling is softer.
  • When cool transfer the dal mixture into a food processor and pulse till the mixture is smooth.
  • Knead the dough (Kanaka) once more and pinch small balls of dough. Roll the filling into small balls as well.
  • On a greased plastic sheet, roll out the dough balls into circles of 3" diameter using your fingers. Place the filling and pinch the dough to close the filling.
  • Using your fingers, roll the stuffed dough ball into a about 8-9" circles.
  • Ideally the filling should be uniformly distributed and the flour skin should be as thing as possible, so trying to achieve the ideal is a good idea. Mine is never perfect, but in my quest for the perfect, I end up making decent stuff..
  • Heat a griddle. When smoking, grease it with ghee. Place the rolled out obbattu on to the griddle. cook of both sides with oodles of ghee.
  • Serve hot with more ghee.
  • It is a tradition to eat holige with Seekarne or coconut milk or simple plain warm milk. I prefer mine with milk and ghee! Serve any which ever way you want, you will still get all the appreciation the dish deserves.

    Notes: (After a long series of replies to questions)
  • The proportion of Jaggery is kind of dicey. Some are too sweet and some are less so. The rule of thumb is the darker the Jaggery, sweeter it is going to be. So 3/4 for a cup of dal should do good. If it is lighter in colour, chances are that the Jaggery is not as sweet and 1cup to 1.5 cups would be ideal. I like to begin with 3/4 of a cup of jaggery for every cup of dal, cook the mixture and taste it before taking it further. If it appears less sweet, it is just a matter of ten more minutes to add a little more Jaggery and go ahead with the process.
  • I know if you are the more orthodox type checking the taste while cooking might not be an option, in that case start with 1 cup of jaggery for every cup of dal.         
  • Also when cooking the Jaggary and dal mixture, make sure that the mixture is not too dry or too sticky (as in it should not leave the sides of the pan like in a Burfi). The mixture should still be moist and sort of slightly molten. It will harden once it is cooler.
  • For the dough, I had the best Obbattu of my life at a friends place. It was thin like a roti but as large as a dosa. Boy! it was awesome. The tip my friends mom gave me was to not add oil to the dough at all but just water. Ah! there is the key. So What I do is I knead the dough using just water, no oil like I would for a bread. The more I need, the more elastic the dough becomes and I end up getting larger, thinner therefore better Obbattus.                                                                                                                                                                                                                                                                   This is my entry to the EFM -sweet

Majjige Huli/ Curried Yogurt

Majjige in Kannada refers to Buttermilk. So Majjige Huli literally translated into 'buttermilk curry'. This for me is a comfort food. Mom makes it often. In fact there was a time when we were kids when my father wanted mom to make it on a particular day every week. This demand was a sort of vestige from all the years he spent in hostels in Mysore.
Majjige huli along with Tovve is sort of a 'must-have' in wedding feasts and other auspicious celebrations. In fact they are sort of the curry coarse trinity -Tovve-Majjige Huli- Areda Huli. Slurp slurp!! It is reminding me of all the dishes served in weddings.... The feast apart, back to the virtues of Majjige huli. It is one quick and easy way of disposing off sour curds/buttermilk. secondly it is rather mild so very gentle on stomach, thirdly it is very easy to make and lastly very tasty ,goes very well with oodles of Ghee and hot hot rice.

Photobucket

You will need,
Ash gourd /Boodhgunbala kai 1 lb cubed
Beaten curds /butter milk 1 cup
Salt

For the Masala Paste:

Coconut 3 tbsp
Coriander seeds 1 tsp (mom does not use it.. it has entered my recipe from god knows where!!!)
Jeera 1 tsp
Green chillies 5 and above ( i use like 10 or so, the green chillies we get here is absolutely bland! so adjust according to your's)
Coriander a handful
Turmeric a pinch
Channa Dal 1 tsp (soaked for about 3-4 hours)

For the tempering
Mustard seeds 1/2 tsp
Oil 1 tbsp
Hing a dash
Curry leaves 7-8

Method:
  • Cook Ash gourd cubes in water just enough to cover the gourd till they are tender and set aside.
  • Grind all the ingredients listed under Masala paste into a fine paste.
  • Place the Masala Paste in a thick bottom pot add about a cup of water used to cook the ash gourd and bring the mixture to a rolling boil.
  • Gently drop cooked ash gourd pieces. Stir gently. simmer.
  • Beat curds and pour it into the ash gourd mixture in a trickle. Keep stirring.
  • Bring the mixture to a gentle boil. Adjust salt.
  • Prepare the Oggarane or the tempering. Heat oil in a pan. Throw in the mustard seeds, hing and curry leaves.
  • Pour the prepared tempering/ Oggarane on the simmering curry. Turn off the heat. One quick stir before serving it with hot rice.
Enjoy!

Baigun Burtha/ Roasted Spiced Eggplant

It is raining Brinjals in my kitchen! May be just that it is winters and we are getting some really handsome eggplant aka Brinjals here in the North East USA. Last week end when we went shopping, i ended up picking two varieties of Brinjals, one our desi Indian eggplant- the small purple round ones, the other one was the big round American ones as well since my Honey was very impressed by the looks of it. It was indeed surprising to see that expression on his face, pointing the big fat brinjals with a twinkle in his eyes, while saying 'Burtha' 'Burtha'... It reminded me of cajoling kids in the snack aisle of grocery stores! So it is Burtha time of the year already.. It just looks like the season of fresh green beans, but it is already time for brinjals!
One word about brinjal, it is a native vegetable of India. I believe Indians have mastered the art of cooking brinjals, so many dishes ranging from rice to appetizers, and most of them yummy. Another interesting thing about brinjal is that either people love them or love to hate them. My dearest friend S used to hate them so much that in Vangi bhaat, she used to eat just the rice leaving out all the brinjal pieces! For me it is no fun. I love them and thankfully everyone in my family happen to love them, including my finicky sis.
Burtha also brings me back my 'Sabarmati' Hostel days; If at all any one of you readers are from JNU, you will know the reputation of Sabarmati hostel. Of the few exceptions that were edible and which i sort of enjoyed were Dahi Baigan, Kadi pakodi and Baigan Burtha!


You will need,
Brinjal/Eggplant/Aubergine 1 big (about 1 -11/2 lbs)
Onion 1 small
Green Chillies 5 and above ( I like mine spicy and use loads of them)
Tomato 1 very small one
Garlic 2 cloves
Salt
Oil to smear + 1 tbsp
Butter 1 tbsp
Salt to taste
Jeera 1/2 tsp
Coriander a handful
Garam Masala 1 generous pinch

Method:
  • Switch on the broiler. Wash the brinjal and wipe them dry. Insert a knife into the centre of brinjal a few times making 4-5 insertions. Spay non stick cooking spray all over or smear some oil all over the brinjal generously.
  • Pop it into the oven and broil till the skin is all charred and the brinjal has shrunk in size.Broiling basically means heating the upper coil in an oven. I can't remember what it is called in the Indian OTG manuals. But it is definitely not called broiling. So make sure to use the right knobs!
  • In the mean time, dice onions and tomatoes as fine as possible. Set them aside. Also grate the garlic, mince green chillies and set it aside.
  • Once the Brinjal is charred and done, pull it out of the oven and let it rest for a few minutes.
  • Meanwhile, heat 1 tbsp oil in a pan. Drop the jeera and wait for it to splutter.
  • Throw in the onion, garlic and green chillies. Cook till the onions are translucent. Add the tomatoes. Cook till they are mushy.
  • Once the brinjal is cool enough to handle, pull out the charred skin and place it in a clean bowl. Using a wooden spoon mash the brinjal till it breaks into a coarse pulp.
  • Toss the brinjal pulp into the onion mixture and cook till all the juices have evaporated.
  • Adjust salt and finish with Coriander and Garam Masala.

Sajje rotti/ Bajra Flatbread

Sajje or Bajra is an ancient grain. My paternal aunt told me stories of her childhood back when I was a kid. She always used to recount how they used to eat Sajje rotti very often and that was their staple with Ragi and Rice. Our family did not know of wheat till she was well into her twenties. She used to grow nostalgic of the taste and its benefits. She always said Sajje was very good and gentle on the tummy, especially caused no acidity or constipation. She is right. Indeed it is one of those super foods that is easy to cultivate even in arid conditions, high in protein and also is very easy to digest. In fact the water in areas where this crop is cultivated was believed to be very good for health, especially in boosting immunity. My aunt had once told me that in Korategere - a small town en route to my native place, the water from the tank was very good, sweet and kept people healthy because Bajra was cultivated in and around the tank. I dont know how true her assertions were but then thus goes the story.

I myself discovered this grain during the course of one of my research projects and since then have been impressed by it. Incidentally we like the taste as well. It reminds me of my MIL as well. I do not actually remember how many times I kept telling her that I wanted to eat Sajje rotti (influenced by my aunts stories of course) But back then I did not know Sajje was Bajra and the flour was available in most of the super markets in Bangalore! Strangely my parents are not as much bothered about the grain. Particularly my father. While his elder sister spoke so fondly about the grain and its gradual crowding out in favour of rice and wheat, my father has indeed taken to wheat and Ragi quite seamlessly!!

This rotti also reminds me of my trip to Belgaum in November 1995 for State level Children's Science Exhibition. I was representing my school and I carried with me an experiment on water pollution treatment.It so happened that, that particular year there was a problem of funding for the organizers. The day we went there, we were told that the organizers did not have enough money to feed all of us. We were kids and carried no money with us, Our teachers were poorly paid state government employees who could not have fed us after all. But then the next day there were some kind hearted donors and the organizers arranged for memorable feasts for all the three days we were there. On one such day, they had served us Sajje rotti, Brinjal Ennegai and a generous dollop of butter! Butter for so many thousands of us, that was a generous contribution indeed. Belgaum is a city with a very big heart indeed. After all these stories, back to Sajje rotti.


You will need,
Bajra flour about 2 cups (more or less i did not measure it accurately!)
water 1.5 cups
Salt 2 generous pinches

Method:
  • Bring the water to a gentle boil in a thick bottomed pot.
  • Dunk a ladle full of flour into the water mixing it throughly. Continue till the mixture thicken and resembles chapati dough albeit softer.
  • Cover and cook for about 2 minutes.
  • Remove from heat and let it cool for a while.
  • Once cool enough to handle, remove it onto a floured surface and kneed it till it is all well mixed and homogeneous.
  • Now pinch small balls out of the dough. smoothening and flattening each ball slightly between your palms as you go.
  • To roll out the rotti, place the dough balls on floured surface. Using your fingers spread it out even as you smooth the edges using your other hand. Keep doing this till the roti is about 8" in diameter.
  • Then take a rolling pin and roll out thin rottis.
  • Heat a griddle. Place the rolled out roti on the hot griddle.
  • Cook on both the sides. Serve hot with butter and Ennegai..

Badnekai Ennegai

Brinjal/eggplant ennegai is one dish that has umpteen variations. In my family we have at least 5-6 versions, my mom makes at least 2 versions, my MIL makes one, I make at least three- two from Mom and one from our North Karnataka neighbour, my sister makes at least 3 mostly different from all these. So each Ennegai is as different as apples and pears.What ever the version is I love them all. They go very well with Chapatis, rotis of all kinds and are equally comforting. This week end, the menu was rather elaborate Ennegai- the version I call unpretentious Ennegai mom's style along with both Sajje/Bajra roti and Jowar/Jolada rotti. The rotis came out perfect and the Ennegai turned out to be delightful. We had a big meal, a brunch in fact and did not have anything till 6 PM which means the meal was hardy.
This version is the quickest of all the versions I make. That is perhaps the USP of this version from mom is its simplicity and ease. I would definitely make it more often if I were to get fresh good brinjals.


You will need,

Indian Brinjal/eggplant the round purple ones small ones about 7
Salt
Oil 3 tbsp
Mustard 1/2 tsp
Curry leaves 8-9

for the masala paste:
Onion 1 small
Tomato 1 small
Garlic 2 cloves
Ginger 1/4"
Cloves 3-4
Cinnamon 1/2"
Coriander a handful
Coconut 3 tbsp


Method
  • Wash the brinjals in plenty of water, drain well and Pat it dry.
  • Grind the ingredients of Masala into a smooth paste.
  • Make a horizontal cut starting from the tip continuing till the stalk but keep the segments together.
  • Using a spoon, stuff the brinjals with the Masala paste.
  • Heat oil in a thick bottomed pan. Toss in the mustard seeds and curry leaves. Once they stop spluttering, place the stuffed brinjals gently.
  • Pour remaining Masala paste and about 1/4 cup of water. Cover and cook till the brinjals are tender.
  • Serve hot with chapati/roti.

Alasande huli/ Curried Black Eyed Peas

It is already holiday season here and of course we had copious snow this sunday. All this in early December.. I guess it is global warming.The first snow is always lovely, has something happy and bright about it. There were snowmen of various shapes and sizes this morning when I stepped out, the snow itself is white and clean..It gets dirty after a while. Today was extremely frigid, in the morning at the train station it was -7 C and as Murphy's law would have it the train was late by 12-15 minutes and I wore the wrong shoes.. My toes though covered with 1/4 " thick woolen socks and my favorite Reebok sneakers, started hurting. Well all for the love of the first snow. Here is a shot of our apartment.


Snow also meant craving for something warm and comforting. I was thinking the whole morning, till I came up with this curry. For lunch we had hot Alasande huli with steaming rice, so hot that almost scalded my finger. But then my stomach and my soul warm up wonderfully. This again belongs to the genre of Huli. Huli can be prepared using vegetables, pulses or greens. Here I have used Alasande. I am not sure if it the same as what we get back home in India, for, the ones available here labeled 'Moth dal' resembles what we call 'Madike Kalu' back home. Nevertheless the favor is similar and tastes great. It has been my favorite curry ever since I remember. Both my mom and my grandmother dish our wonderful versions of this curry. Mine is identical to their's in terms of ingredients; in terms of measurements god knows how far I am!!


Serves 4 ||  Calories per serving (Kcl) | total 180 | Protein 7.8 |  fat 5.7 || Fiber 1.6 gm |


Moth Dal  1/2 cup
Onion 1 small
Tomato 1 small
Coconut 3 tbsp
Coriander a handful
Huli Pudi/ Sambar Powder 2 heaping tsp (adjust according to taste)
Tamarind extract 1 tsp
Ghee 1 tbsp
Mustard 1/2 tsp
Hing a generous dash
Curry leaves 7-8
Salt to taste
Jaggery crushed 1 tsp (optional)

Method:
  • Pick and clean the Moth dal. Keep a keen eye on these tiny fellows, it is indeed hard to make out stones and mud from them. Wash several times in water. Combine washed dal and about 2 cups of water in a pressure cooker and cook for a at least 2-3 whistles (Mine does it in 2) Set it aside.
  • Meantime. Roast the onion on a skillet without using oil or any other medium, till it is slightly charred. Combine coconut, roasted onions, tomatoes, coriander, Sambar powder and tamarind extract in a blender. Blend till it is very smooth.
  • Pour the paste into a thick bottomed pot and cook till the Masala is cooked and smell fragrant. About 20-30 minutes.
  • Mix in the cooked dal and bring it to a gentle boil.
  • Prepare the Oggarane/ Tadka. Heat Ghee in a small pan. Just when the ghee is to start smoking, drop the mustard seeds, Hing and curry leaves. Soon after they stop spluttering pour it onto the curry adjust salt and Jaggery. Turn off the heat and serve it with steaming hot rice.

    P.S: I do not use Jaggery in this curry myself because the dal itself is sort of sweetish. But then it is optional!

Capsicum Bhaat

Capsicum bhaat is sort of a forgot dish in my kitchen! It has been ages since i last made it. This past week end, when we visited my brother-in-law and co-sister, we were treated with dish along with other goodies. My co-sister has dished up quite a few treats despite her tight schedule! Good food should always be appreciated and of course what better time than thanksgiving weekend? After coming back, i got some capsicum and bingo, this is what we packed for lunch yesterday... The blue box is my honey's and the pink one.. mine. (though i hate to type cast pink as a feminine color!)

Capsicum Rice

Rice 3/4 cup
Water 1.5 cups
Capsicum 3/4 lb diced
Onion 1 big diced
Tomato 1 big diced
Oil 2 tbsp
Mustard seeds 1/2 tsp
Jeera 1/2 tsp
Hing
Curry leaves 4-5
Chilly powder 1 tsp (or so..)
Cloves 2-3
Garlic 1 clove
Coriander a handful

Method:
  • Wash rice in plenty of water, draining and changing water several times.
  • Combine washed rice and 1.5 cups of water cook till done. I use a pressure cooker to cook rice. When cool enough to handle, spread the cooked rice on a plate and cool.
  • Heat oil in a pan. Drop the mustard and jeera. Once the spluttering stops add the curry leaves and hing.
  • Now combine chopped onions and crushed garlic and cook for a few more minutes till the onions are golden.
  • Add the tomatoes, chilly powder, crushed cloves and cook till oil separates about 6-8 minutes
  • Combine diced capsicum.( Sprinkle some water if required) cook covered for about 10 minutes till the capsicum is tender but still has a crisp bite to it.
  • Finish with fresh coriander. Mix the rice gently into the spiced capsicum mixture.
  • Serve hot or at room temperature. This is a great dish to pack for lunch.

Tomato Masala

Dhabas all over India are cultural institutions in its own right. There are umpteen number of Dhabas on all highways radiating out of Bangalore. In fact when we were kids, the Dhabas mostly the family Dhabas were the most affordable joints serving north Indian food (strangely tasting south Indian!) meaning Dal fry, Tomato Masala, Roti, and Panner butter masala etc. The other day i started craving for Dhaba food and bingo Tomato Masala was whipped up. It definitely is not the only recipe, I am sure for tomato masala. This just happens to be my favorite. The Dhaba versions are generally greasy, but the dry tandori roti is perfect to mop up all the grease and all. So i have used a lot of oil, which can be easily reduced if not preferred.

Tomato Masala

We will need,

Tomatoes 4 medium
Onions 2 medium
Vegetable oil 1/4 cup
Cloves 3-4Bulleted ListCinnamon 1/4"
Garlic 3 cloves crushed
Curry leaves 8-10
Chillies green 7 and above
Jeera 1 tsp
Salt to taste

Method:
  • Dice onions length wise. Chop tomatoes into big chunks.
  • Heat oil. Toss in the jeera, green chillies and curry leaves.
  • Drop the onions and cook for a minute. Toss in the crushed garlic, followed by the tomatoes.
  • Cook till the tomatoes are tender and all mixture is sort of thick. Add the cloves and cinnamon. Cook for 3-4 minutes, adjust salt.
  • Remove from heat. Serve hot with rotis.

Aloo Bun

These days, the sun sets at around 4 PM here. That evenings come so early, both me and my honey we start craving for Iyengar bakery snacks. That is when we grow home sick. Just to beat the home sickness, I remind myself of Bangalore traffic, my home sickness disappears almost immediately.. In fact I tried this strategy on my honey as well, it seems to work! So folks, whenever you grow homesick, especially those of you from Bangalore, just think of Bangalore traffic, it will make you feel better.

Coming back to Iyengar bakery, i have mentioned it so many times, and I will keep missing it. In fact last night in my dream, I had just landed in Bangalore and in full view of MIL, i am pigging my way through Khara bun, sweet bun, Aloo bun, puffs, etc etc! That is a true foodie right! So last evening, we started craving for aloo bun. Obviously, there was no time for preparing my own dough, also here in this cold, i wonder if yeast will do a good job. So I took some help from the grocery shop. It worked out fine! I was confused when it came to selecting the dough at the grocery shop. Finally i settled for Crescent Rolls, not only because it is looks nice, but also because it is rich buttery and moist. Makes a great pair with the savory potato filling.

Aloo Bum

Serves 8 ||  Calories per serving  196 Kcl || Protein 3.5 gm ||  fat 9.6 gm || Fiber 1.6 gm

Crescent roll dough store brought 1 pack of 8
Potatoes 2
Onion 1
Green chillies 4-5
Curry leaves 5-6
Oil 2 tbsp
Mustard 1/2 tsp
Hing a dash
Salt to taste

Method:
  • To get a head start, chop the potatoes, sprinkle a little water and microwave it on high for 2-3 minutes.
  • Heat oil in a pan. Add mustard, Hing and curry leaves. Once it is done spluttering, add diced onions.
  • Cook onion still soft and add potatoes. Sprinkle some water, cover and cook till potatoes are soft-tender. Set it aside and cool.
  • Read the instruction on the crescent roll package. Unpack and lay out the dough triangles. preheat oven to 375 F.
  • Take a spoonful of potato filling into the centre of the dough triangle.
  • Roll it starting from the broader end, pinching the smaller end at last.
  • Place the rolls on an un-greased cookie sheet and bake for about 15-18 minutes.

Cabbage Palya

My good friend A is from Kerala and is great cook.Because of her, my whole perception of Malayali food changed. We Kannadigas have a problem with food when ever we visit Kerala. The smell of coconut oil, 'beef stew' on the menu all contribute to the problem! That remained my perception all these years even though my cousin lived in Kerala for long long years and we visited her often, I never grew to appreciate Malayali food much until I met A. She single handedly changed my perception about Malayali food! It is she who introduced to Malayali Fish curry ( which I now make very often! ), Kaalan, assorted Thoran, Avial, Stew, Aappam and the list goes on....
As a cuisine, in my list Malayali food definitely reigns with in the top 10 now. Our families (mine and A's) we keep meeting often, at times at our place, at time her's. On one such day at her place, she served us this side dish. Thoran is much like Palya but much richer with an abundance of coconut.

Cabbage Toran

Cabbage a small head chopped
Coconut 1/2 cup grated
Oil 1 tbsp
Mustard 1 tsp
Curry leaf 5-6
Green Chillies 3-4 slit
Ginger 1/4" minced
Lemon 1
Salt
Urad Dal

Method:
  • Mix cabbage, coconut and ginger. Dump it in a pan and switch on the heat. Cook till crisp tender.
  • In another pan heat oil for the tempering. Drop the mustard, curry leaves, green chillies and urad dal in order. Switch off the fire. Now stir in the tempering into the cabbage mixture.
  • Stir well and take it off from fire. Serve with rice and dal

Dum Aloo and Jeera Rice

Threw a small party for my honey on his birthday. We had around ten people for dinner. So designing a menu was pretty difficult, it had to be special, he had to be scalable ( to make in large quantities) and a crowd pleaser!thought for a long time before settling on Dum Aloo and Jeera Rice.It was a hit indeed.Now it is going to be on my party foods for ever. It is very time consuming but it is definitely worth all the time and effort. To get a head start ( i did not do this and ended up spending 3 hours at the stove!) start with the gravy, once the onion goes into the pot, start frying up the potatoes; So that the potatoes and the gravy will get done almost at the same time.

Photobucket

Potatoes cut into 1.5" pieces 4 large (I did six pieces per head and it worked well)
Tomatoes 2 ground to a smooth paste
Onions 1 large minced
Garlic 3 cloves (big) ground to a smooth paste
ginger about 1" ground to a smooth paste
Cashews 1/4 cup ground to a smooth paste
Chilly powder 2 tbsp (mine is not too hot, so adjust accordingly)
Dhania powder 1 tbsp
Turmeric 1/4 tsp
Garam Masala 1/4 tsp
Kasuri Methi or Coriander a handful
Yogurt 1 cup
Heavy cream 1/4 cup
Bay leaf 1
Cardamom 2
Cloves 4
Cinnamon 1/2"
Jeera 1 tsp
Star Anise 1
Oil to deep fry + 3 tbsp
Salt

Note: During my hostel days, our cooks used to prepare excellent Dum Aloo. I had asked for the recipe, though the ingredients are similar, they had suggested piercing the potatoes with a fork before frying. ( At the mess they had something like a metal brush with sharp nails done to it) I did not do it. I am not sure if this method enhances the taste of the dish. I will try it next time i make :)

Method:
  • Soak the cut potato pieces in water till it is ready to be fried. Once the oil is hot enough, remove potatoes from water, pat it dry with a paper towel. Gently nudge them into the hot oil using a heat proof spatula.
  • Fry the potatoes till golden brown. They do not need to be cooked throughly. Remove,set aside. Repeat with the remaining potatoes.
  • For the gravy, add 3 tbsp oil in a pot. Drop the bay leaf, anise, clove, cinnamon and Jeera.
  • Follow it with minced onion. Cook till almost brown. It almost took me about 20 minutes to get there!
  • Now stir in the ginger paste, garlic paste, chilly powder, Dhania powder and turmeric into the onion. Stir for a few minute and add the tomato puree. Cover and cook till the raw smell of the masala disappear.
  • Stir in the cashew paste. Cook for a few more minutes, taking care that the mixture would not burn. It burns very easily at this stage.
  • Once oil starts oozing from the mixture, reduce heat to the lowest. Whisk the yogurt once and slowly stream into the mixture stirring continuously. Make sure the mixture is well combined. Cover and bring it to a boil. Simmer.
  • Now gently slide the fried potatoes into the simmering gravy. Cover and cook till the potatoes are soft and crumbles if gently pressed between fingers.
  • Adjust salt, gently add the cream, sprinkle garam masala and finish with either Kasuri Methi or coriander. If using Kasuri Methi, cook the gravy for a few more minutes with the Kasuri Methi so as to infuse the flavour very well.
  • Serve hot with Jeera rice.
Jeera Rice

Basmati rice 3 cups
Raisins 1/2 cup
Jeera 1 tbsp
Onions 2 large diced
Coriander 1 big bunch
Ghee 2 tbsp
Water a little over 5 cups
Salt

Method:
  • Soak the rice in water for about 20 minutes.
  • Heat ghee in a thick bottomed pan. Add Jeera, once it splutters, add the onions. Cook till the onions are brown at the edges.
  • Drop the raisins (Well I am not sure if traditional Jeera rice recipe calls for raisins, but this was for a party and I wanted it to be rich. This ingredient is of course optional)
  • Stir till the raisins plum up.
  • Now add water and adjust salt.
  • Once the water starts boiling gently mix in the rice. Cover and cook.
  • When almost done stir in the coriander. Cook till the rice is completely done
  • Serve hot with Dum Aloo..

Mango Cake

The season of baking continues. I baked some Mango Cake for my Honey's birthday. My Mom used to make Mango Cake long time back... back then when me and my sister would come back from school and pester Mom to give us something to munch on before we rushed out on to the dusty streets to play till sun down! Mom used to make delightful baked stuff, biscuits, cakes and Mysore pak (It was her way of using up extra ghee in the pantry at the end of the month). We always got something to munch on back then. That was long ago. Even though Mom graduated from the pre-historic 'Johnson' oven with a glass top to 'Lexus' OTG, her baking took a back seat. After all empty nest is no incentive to bake..

Photobucket

Even though Mango cake is generally frosted with butter cream, I prefer freshly whipped cream. Here is the recipe. For the cake to be moist and light, the measurements need to be exact. So investing on a measuring set is not a bad idea after all. Also leave the butter and eggs on the counter overnight so that they are at room temperature before baking

Maida (All Purpose Flour) 2 cups
Mango Puree 1/2 cup (I used the canned version!)
Baking Powder 1 tsp
Baking Soda 1 tsp
Salt 1/2 tsp
Lemon Juice 1/2 a lemon
Butter 1 stick (1/2 a cup)
Honey 1/2 cup
Powdered Sugar 1/2 cup (1.25 cup if using fresh mango pulp depending on the sweetness preferred)
Eggs 2 separated

For the frosting
Heavy Whipping cream 1.5 cups
Sugar powder 1/4 cups
Mango Puree 1 tbsp

Method:
  • Preheat Oven to 350 F. Grease a 9" round baking tin.
  • Sift the flour, baking soda, baking powder and salt 2-3 times so that all the ingredients are well combined. Set it aside.
  • Using a hand mixer or a spatula, cream the butter (stir vigorously) with sugar and honey.
  • Reduce the speed to low and slowly stream in the mango puree followed by the lemon juice and egg yolks. Keep mixing till very well combined.
  • Not add the sifted flour mixture a table spoon by tablespoon till combined into a smooth mixture. Stop and set aside.
  • Now whisk the egg white till they form stiff peaks.
  • Fold in the egg whites into the flour mixture gently.
  • Pour into the baking tin and bake for about 25-30 minutes. Keep a close eye after 20 minutes.
  • To check if the cake is done, insert a toothpick right at the center of the cake. If it comes out clean, the cake is done. If not, the cake needs a few more minutes in the oven.
  • Cool the cake to room temperature before frosting of your choice. I prefer a whipped cream topping!
For the whipped cream:
  • To whip the cream, set the blades of the hand blender and a metal bowl to work with in the freezer.
  • Take a big bowl of ice. Take the heavy cream in the metal bowl and place it on the ice.
  • Start whipping on low speeds. Add a tablespoon of powdered sugar. Gradually increase the speed to high. Keep adding the rest of the sugar till all the sugar is used up. Whip till stiff peaks are formed.
To finish the cake,
Turn the cake upside down. Spread the whipped cream uniformly over the top of the cake. Spread it gently onto the sides. Dot it with the Mango puree. Alternately. Pour the mango puree and 1/4 of the whipped cream simultaneously into a piping bag and decorate the cake as desired.

This is a piece of the cake i test-baked with a mango butter cream froasting.. Still i prefer whipped cream any day, any time!


This recipe goes out to the anniversary event held by Aparna After all this is a celebratory fare, indeed the first time in three years of marriage that I was with my honey on his birthday!

Chow Chow Bhath

Saturday was my Honey's birthday! So I treated him with this breakfast..Chow Chow bhath is Upma also known as Khara Bhath and Kesari Bhath served together.
Here are the recipes, Upma and Kesari bhath

Chow Chow Baath

Needless to say he loved it! It was a matter of minutes that we were licking our spoons! ( I love licking my plate @#i know it is yucky but..@#.. But well a few years ago it was mom yelling, 'STOP IT WILL YOU.. It is inauspicious to do so' Now it is my Honey,yelling 'U R Disgusting!' So no licking plates yet!)

More Awards!!

It is raining awards!! Thanks Lakshmi ... I always wanted the chocoholic award even though there are not too many chocolate based recipes on my blog.. the reason is clear enough.. for the chocoholic I am, there are just not enough chocolates left over to cook!!!!


Was just wondering whom to pass these one, Lakshmi has a big list already!! I will have do some blog-hopping before passing these on.. for now, it is more foraging my kitchen for something ...chocolate!!!

Awards

Yuppieeee!!! I got another set of awards!! Thanks a lot N33a for the awards! With awards comes extra responsibility and it is so inspiring to go that extra step and work hard at the kitchen as well as on the computer!!My husband was kidding me about my new habit of keeping the camera in our kitchen and taking pictures soon after finishing my daily cooking. My fellow bloggers are also setting new standards by the day and forcing me work that much more harder! and I am loving it all! Though relatively new to the world of food blogging, I have met very talented and creative people. Keep it going people, it is wonderful to be around.

N33ma has also tagged me for 7 MEMe

7 Things I Say More Often:

1) Holy Cow!
2) Nim Aggi ( Something silly in Kannada, which cannot be translated)
3) Oophs!
4) Hi...
5) Love it
6) Feel like eating....
7) Do not smoke! (to my husband)

7 Things I Did Before:

1) Experimented in my Kitchen with disastrous results and my father managed to eat them all...
2) Traveled kilometers to grab my favorite foods...
3) Thought of eating something in the middle of night; made it; ate it and then slept
4) Wandered in my grandfather's mango orchards picking mangoes, Avarekai and Elachikai.
5)Woke up with the rooster when the morning mist hung heavily with the smoke from the wood fired stove in my grand mother's kitchen...
6) Had some of the best ever tasting food at my grandmother's and the mother's kitchen.
7) Had a live long lasting fun with my sister, and look forward to more

7 Things I Do Now:

1) I am reading V S Naipaul's India a Wounded Civilization for the second time!
2) Take the train to work
3) Come back home and cook food
4) Blog with all my soul
5) Talk to my folks, my sister, parents and in-laws.
6) Having evening snack with my honey
7) Sleep sharp at 10.30 P.M!!!

7 Things I Want to Do:

1) I want to do a Post-doc and publish a lot of papers...
2) Make my blog a better place, make recipes exact and measurements perfect!
3) Try new recipes and get to know more cultures through its food
4) Cling on to my own roots, culture and food and at the end of the day relish nothing but Rasam and hot rice.
5) Try out my friend A's Malayali recipes next week.
6) Pack my bags for our upcoming vacation!!
7) Go on a pilgrimage in India....

7 Things That Attract me About Opposite Sex:

Commenting on opposite sex.. my honey might not like it much!!!
1) Intelligence
2) Common sense
3) Financial prudence
4) Ability to handle babies
5) Cooking skills
6) Chivalry
7) No smoking, no boozing!!!

7 Favorite Foods:

1) Hot rice Tove, Rasam, Curds and Palya
2) Darshini style food
3) Masal Puri and assorted Chats
4) Panner Tikka
5) Indo-Chinese food....
6) Indian Sweets..
7) Chocolate!!!


Passing these awards and tagging the MEMe to these fellow blogger...

1) Lakshmi
2) SMN
3) Ramya
4) Vani
5) Sushma
6) Deesha
7)Ujju
8)Gayatri

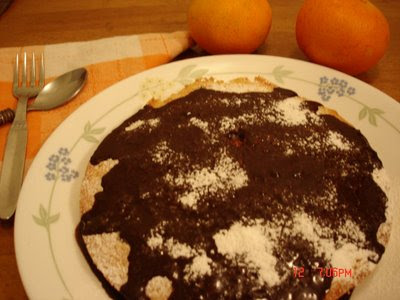
Orange cake with Chocolate Glaze

November for me means the season of baking. Not only is our wedding anniversary is in November, my Honey's birthday is also in November. Later December is again my Mother's birthday followed by the New Year!! So I end up baking for all these occasions. My most successful has been the plain cake and fruit cake. But this time around I have trying to do something more than just those two cakes that I have always made. I have always made cakes from scratch, just like my Mom. Mom makes excellent Mango Cake, Honey Cake apart from the plain and fruit cakes. She also makes excellent biscuits. Just yummy I should say. She went to pastry and cake classes conducted by Bangalore University long back and she seemed to make real good cakes even in the most pathetic of ovens! The only Johnson ovens, small round ones with a glass top... the real olden day ovens too. Those ovens did not have temperature control or anything, just switch it on and that's it.. I on the other hand cannot bake with my hand mixer, my bake ware, my oven and all the assorted odds and ends in my kitchen! Any ways I do want to be half as good as my mom.

So inspired by the baking season, I tried making Orange cake, of course substituting mangoes for oranges in my mother's Mango Cake recipe. It turned out soft and moist. But the flavor was not as robust has I would have wanted. I guess I should have added a small shot of Grand Marnier to the batter and it would have improved the flavor. I will try that next time around.
This time around, I made a really small cake, we demolished it the very same evening though!


All purpose flour 1 cup
Orange juice 1/4 cup
Orange Zest 1 tsp
Baking powder 1/4 tsp
Baking Soda 1/4 tsp
Salt a pinch
Milk 2 tbsp
Butter 1/4 cup (1/2 a stick)
Honey 1/4 cup
Powdered sugar 2 tbsp + additional to dust
Egg 1

For the chocolate glaze:
Dark Chocolate chunks 1/2 cup chopped
Orange juice 2 tbsp
Sugar 1 tbsp

Method:
  • Preheat oven to 350 F.
  • Sift flour, baking soda, baking powder and salt twice or thrice and set it aside.
  • Separate egg white and yolk
  • Cream butter and sugar. Combine honey, milk, yolk ,orange juice and zest while creaming on low speeds.
  • Add spoon fulls of flour to the mixture and continue mixing on low speeds. Keep adding the flour tablespoon by tablespoon till the flour is all combines and the batter is smooth.
  • Beat egg white till stiff peaks.
  • Fold the egg whites into the batter gently.
  • Grease a 6" baking dish. Pour the batter into the dish Tap to spread the batter evenly
  • Pop it into the oven and bake it for about 25-30 minutes.
  • To test if the cake is done, insert a toothpick at the very center of the cake. If it comes our dry and neat, the cake is done.
  • For the glaze, Melt the chocolate chunks on a double broiler, stir in the sugar and orange juice and stir to combine well. Remove and cool. Alternately, dunk the chocolate, orange juice and sugar into a microwave proof dish. and microwave for about a minute (may be minute and a half) Stir well to combine and set it aside to slightly cool and thicken.
  • Once the cake is cook enough to handle, un-mould it. Pour over the chocolate glaze all over. Cool and dust it with the powdered sugar.

Kadai Paneer

Today is Friday.. my favorite day of the week. Friday called for something special. So churned up some Kadai Paneer and it turned out really tasty, just right for a Friday dinner. I wish I had a Kadai, it would have made a nice presentation. Paneer always reminds me of my sister. She makes the best ever Methi Muttar Panner in the whole world. But she has never shared her recipe. I have always been sure that she has a secret ingredient and I have never managed to find it out. This time when we meet, I should make sure to extract the recipe...
But for now, Kadai Paneer suffices.


Paneer 250 grams diced
Onions 2 medium diced
Tomato 3 big chopped
Garlic 2 cloves grated
Ginger 1/2" grated
Green Chillies 4 and above minced
Chilly powder 1 tsp and above
Dhania powder 1 tbsp
Turmeric 1 pinch
Oil 3 tbsp
Cloves 4
Cinnamon 1/2"
Milk 1/4 cup
Jeera 1 tsp
Capsicum 1 small diced
Pepper powder a dash
Salt
Fresh Coriander

Method:
  • Heat oil in a pot. Add Jeera, once it stops spluttering add the diced onions. Cook till the onions are browned and crisp at the edges.
  • Add grated garlic and ginger, minced chillies, chilly powder, dhania powder, turmeric and the tomatoes. Sprinkle some salt and simmer.
  • Using a spatula gently crush the tomatoes (if using big chunks ) and stir. Cook till oil floats on top.
  • Gently mix in the Paneer, Capsicum. (I dice Paneer rather small about 1/2" cubes, so that a little goes a long way; it can be diced as small or as big as fancied!) Simmer.
  • Once Paneer is heated through and capsicum is crisp-tender, stir in the milk gently combining everything.
  • Crush the cloves and cinnamon and sprinkle it over the Paneer mixture.
  • Bring it to a gentle boil. Adjust salt and finish it with fresh coriander. Serve it hot with Chapatis.

Tili Saaru/Toor Dal Curry

Bele Saaru literally means dal curry. It is thinner than the normal dal, but thicker than Rasam. I love this curry and it is my ultimate comfort food. This is one dish that comforts my palate and is gentle on my tummy on long hard days. I am sure every household in Karnataka has their own recipe for this particular dish. In my family my maternal grandmother 'ammaji' as we call her wins any competition for this dish hands down. She tells me the taste of this curry is in the toasting spices for the spice blend. I never quite managed to get as close to her, or for that matter my mom either who is at a distant second. But definitely my Bele Saaru is pretty good!! The recipe I am uploading is however my grandmother's; the best ever I have ever had in my life!


For the Tili Saaru Pudi / spice blend

Chillies 500 gms (I use 50% bright colored chillies +50% of the hot variety)
Dhania 500 gms
Pepper 12 grams
Fenugreek 12 grams
Urad Dal 12 grams
Jeera 90 gram
Hing 12 grams
Turmeric 12 grams
Jaggery 50 grams
Mustard 30 grams
Curry leaves dried one big bunch
One fistful of sea salt

Method:
  • Toast each of the spices (excluding the salt) on medium flame till fragrant. Set it aside separately.
  • Toast the Chillies at the very end otherwise it can get smoky and the kitchen will get stuffy (I went through the stuffy kitchen experience!) Set it aside and cool.
  • Grind in into a slightly coarse powder using a Coffee Grinder. Mine works perfectly fine for this recipe and i am very happy with my Coffee Grinder. It has become my favorite kitchen gadget.
  • Store the spice blend in an airtight container. It stay good for months. Mine in fact lasts for anywhere around 4-6 months. This spice blend makes an ideal gift as well.

To make the Tili Saaru

Tili Saaru pudi 2 tbsp
Toor Dal 1/2 cup
Tomato 1
Turmeric a pinch
Ghee 2 tbsp
Hing 1 pinch
Mustard 1/2 tsp
Dry red chillies 3
Curry leaves 8-9
Salt
Tamarind paste 1 tsp
Jaggery a small piece
Fresh Coriander a small bunch

Method:
    Combine the dal, tomato, turmeric and 1/2 tbsp ghee and water in a pressure cooker and cook till done. Set it aside to cool.
  • Combine the spice blend, tamarind and jaggery with 2 cups of water in a thick bottomed pan and bring it to a boil. Simmer and cook till fragrant. About 15 minutes.
  • Add the dal mixture to the simmering spice blend mixture. Mix well. Simmer.
  • Heat ghee in a pan. Drop the mustard seeds, Hing, whole chillies and curry leaves. Turn off the heat.
  • Carefully pour the Ghee tempering on to the simmering dal. Adjust salt and finish with coriander.

This dish goes out to WYF Kitchen gadget Event hosted by easy crafts My Gadget is of course my pet Coffee Grinder!


My dear friend Lg suggests adding a spoonful of coconut milk to the Bele Saaru to make it richer and of course tastier!

Pulav/ Spiced Rice & Vegetables

Pulav is a very festive rice dish. There is no one in my family or friend circle who does not like Pulav.. It is a sort of safe dish to make when expecting guests and we have no clue what they would like!
Because it is so festive, i prepared for our anniversary yesterday. We has a very good meal and a good siesta too! Love days like those.


Basmati rice 1 1/2 cups
Mixed vegetables (beans, carrots, peas and potatoes) 1 1/2 cups chopped
Red Onion 1 medium diced
Fennel seeds 1 tsp
Star anise 1
Bay leaves 2
cardamom 2
Ghee 3 tbsp
Coconut milk 1 cup (optional) + water 2 cups or 3 cups of water
Juice of 1 whole lemon
Salt

For the spice mixture:
Garlic 3 cloves
Ginger 1/2 "
Cloves 6
Cinnamon 1/4"
Coriander 1 small bunch
Mint 1 handful
Green chillies 10 and above

Method:
  • Grind all the ingredients in the spice mixture into a smooth paste. Set it aside.
  • Soak rice in water and set it aside.
  • Heat ghee in a pressure cooker or any other pot with a thick bottom. Drop the bay leaves, fennel seeds, cardamom, star anise and stir for a minute.
  • Add the diced onion and cook till onions are translucent. Combine the chopped vegetables stir and saute for a 5 minutes.
  • Add the spice paste and bring it to a boil. Simmer till the ghee floats on top
  • Now add the coconut milk/water and bring it to a boil. Squeeze in the lemon and adjust salt.
  • Combine the soaked rice gently. Cover with a small vent for the steam to escape. If using pressure cooker cover and do not use weight instead invert a small steel glass and reduce heat. Cook till the rice is done.
  • Serve it hot, preferably with pachadi.